Have you ever had something like this before? Did I invent a new delicious morning treat?
Yield
6 jumbo buns
Rise Time
14-16 hrs
Hands On Time
45 min
Bake Time
30 min
Why I like this Recipe
An enriched sourdough bun built around three forms of vanilla, with optional 40% whole-grain Sonora flour for nuttiness and structure. Cold-fermented overnight, baked off in jumbo muffin tins, and glazed with vanilla syrup the moment they come out of the oven.
104g Sonora flour (you can sub in as little or as much as this, all bread flour works great as well)
130g milk
40g granulated sugar
1 egg
1 t vanilla extract
1 t vanilla paste
5g salt
55g super soft, almost melted butter
Filling
80g granulated sugar
55g butter
1T vanilla paste
Vanilla Glaze
50g sugar
30g water
1t vanilla extract
Hi sweet Early Risers,
A common experience we share as humans is those prickly, unignorable specks of ideas that come creeping into our heads. Before we can even trace the evolution of the idea, before it's fully formed or clear, it's just... there. That's how these buns came to me. Rodelle sent me a generous package filled with extracts, vanilla paste, and spices, and I knew I wanted to make something that truly highlighted their incredible vanilla. My mom loves vanilla, so I leaned all the way in. I also added 40% whole grain Sonora flour from Bluebird Grain Farms (a very cool, woman-owned small business here in Washington), though you can adjust the percentage of whole grains in this recipe depending on what you're going for.
Sweet Stiff Starter (Instructions)
Mix all ingredients together well. Knead for 5 minutes until it starts to smooth out. Ferment at 78-80 degrees minimum. This will work for an overnight fermentation, do this right before bed. If you can, use your oven with the light on but oven off, and do NOT put the starter right by the light, or invest in a proofer, my #1 favorite tool that I use daily. If you plan on using the starter sooner, you can use the proofer at 85 degrees, but don't let it over ferment. You'll know this happened if the starter smells super strong, like apple cider vinegar. This will make sour buns.
The sweet stiff starter needs to rise at a warm temperature, and needs at minimum a 30% sugar to flour ratio. Why? Because a warmer temperature encourages yeast growth and not bacteria growth. Bacteria growth is what makes the acidic flavor stronger and for a sweeter and enriched dough, I prefer it less sour. If you don't mind a sourer final bread, you can ferment your sweet starter at a colder temperature. The sugar in the dough also helps feed the yeast and will help curb the sourness. There is a very science based and in-depth blog on Wordloaf's website here, where Andrew describes Ian Lowe's process for a sourdough brioche. It is very informative and I highly suggest you read it. I have long supported Andrew (@wordloaf)'s blog and if you subscribe to any baking blog, this one should be it.
Please look at the image above to reference how much your starter should grow. You can also see this Instagram video on my page that shows you what it looks like internally. It's really cool!
Final Dough
Mixing: Mix starter, flour, milk, sugar, egg and salt together. If you're mixing by hand mix it for 3-5 minutes until it comes together and doesn't have any lumps. I highly suggest you use a stand mixer on the lowest setting, but it can be done by hand. Let the dough rest for 10 minutes, then slowly add in the butter. Do not turn your stand mixer up! At the lowest speed, my KitchenAid stand mixer took 25 minutes to mix the dough. You want it coming off the sides, but it doesn't have to reach full windowpane stage. Do not turn up your mixer because it will heat up the engine AND your dough, and that will cause the gluten to weaken which will affect the final rise and make your loaf more prone to collapse. If you are mixing by hand, I suggest you use the "slap and fold" technique to help keep your hands from cramping.
Ferment: When your dough is fully mixed, transfer it to a lightly greased (I like to use the leftover butter that is stuck on the wrapping paper) container and cover. Ferment in a warm spot for 3 hours and then place in the fridge for a minimum of 3 hours. It is important that this silky dough is cold when you fill it and shape it.
Make the filling: mix together the sugar, butter and vanilla paste and beat it well until it's very light and fluffy. Set it aside and do not refrigerate. It needs to be spreadable when you fill the dough.
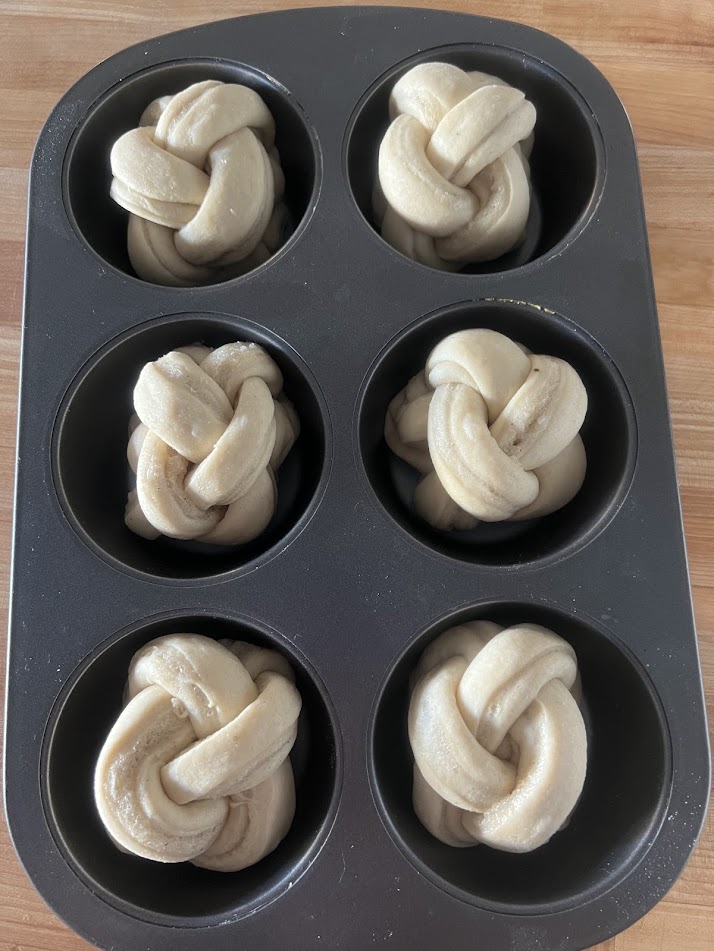
Final shape and proof: When your dough is cooled, lightly flour your counter and shape it into a rectangle, approximately 9" by 12". Spread the filling evenly over the surface of the dough, fold it in half lengthwise (so you have a 9" by 6" (or so) rectangle of dough) and cut into 6 strips. The above linked video shows the whole process. I used a jumbo muffin pan, but a quarter sheet pan or 9" by 13" baking pan lined with parchment will also work, they don't have to be in muffin shape. If you use a muffin tin, you can line it with paper liners or use some oil to prevent sticking. Cover and place the shaped buns into the fridge until you're ready for bed and take them out right before you go to bed. If you used the Sonora flour, do this RIGHT before bed and don't put them in a warm spot. If you used all white flour, it's safe to let them final proof longer and a bit warmer, so put them in a warmer spot in your kitchen.
Buns before final proof.
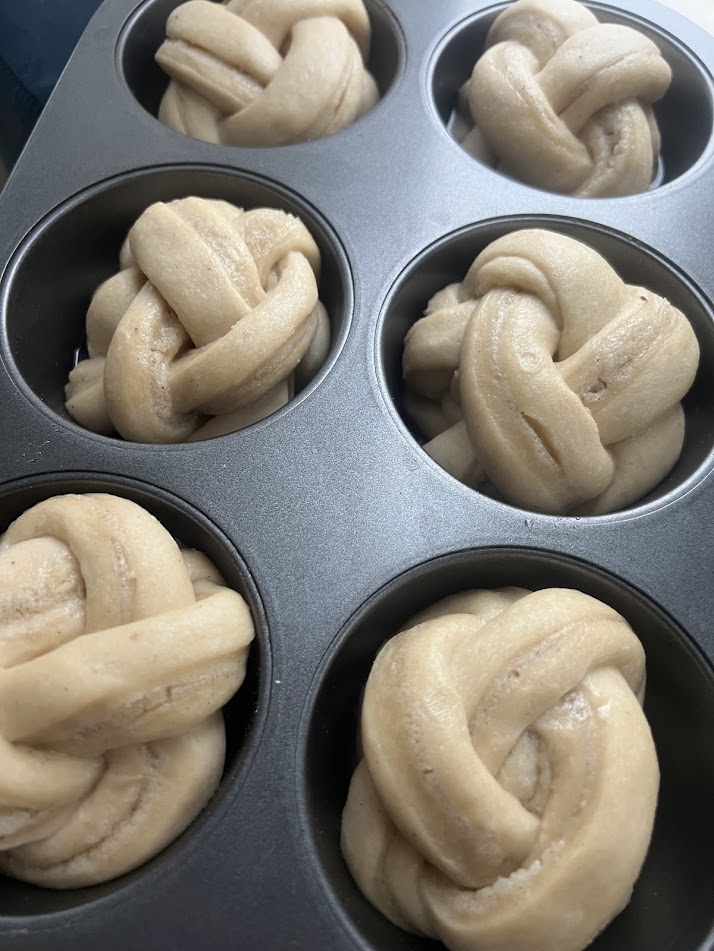
Buns after final proof, right before the oven.
Bake! The next morning, heat your oven to 400F. It's ok if the buns aren't huge - if you did your final proof in a cold spot overnight, they won't be giant and that's ok! If you decided to put them in a proofer at a super warm temp and skip the overnight final proof, they will puff up more and lose more filling, that's ok! Both methods work. Bake the buns for 5 minutes at 400, then reduce the oven to 350 and bake an additional 25 minutes. The darker the color, the more caramel flavor you'll have, but the buns will have crunchy spots. If you go lighter on the bake, which my family prefers, it'll turn out super soft. Make sure to test doneness before they leave the oven, the buns should reach 190F internally. Oven temps vary so much, don't use my timing as the be all end all, watch your buns and make sure they are fully cooked.
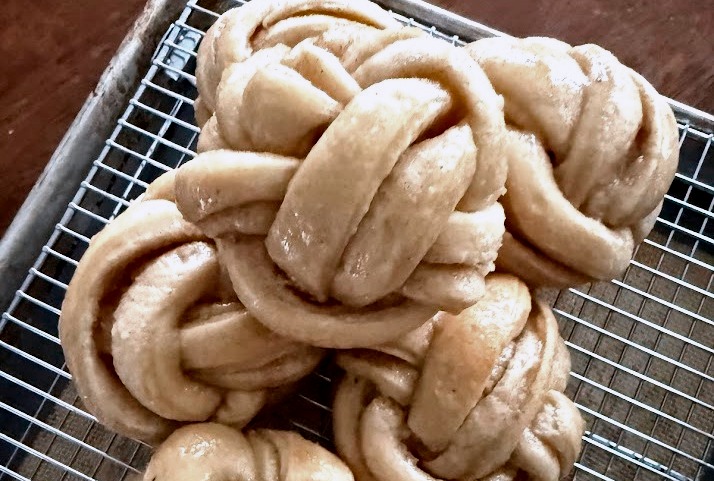
Glaze: gently heat the sugar and water until the sugar dissolves and let it slightly cool. Then pour in the vanilla. When the buns come out of the oven, immediately brush with the glaze and be generous!
EAT THEM! These are incredibly delicious 10 minutes after they're done baking with a steaming cup of coffee. Please comment if you make these!
Your Rating
Thank you! Your submission has been received!
Oops! Something went wrong while submitting the form.
.png)